Overview
This document will cover Item Creation in Heartland Restaurant. There are many ways to create items in Heartland Restaurant, this is one of the ways to accomplish creating items.
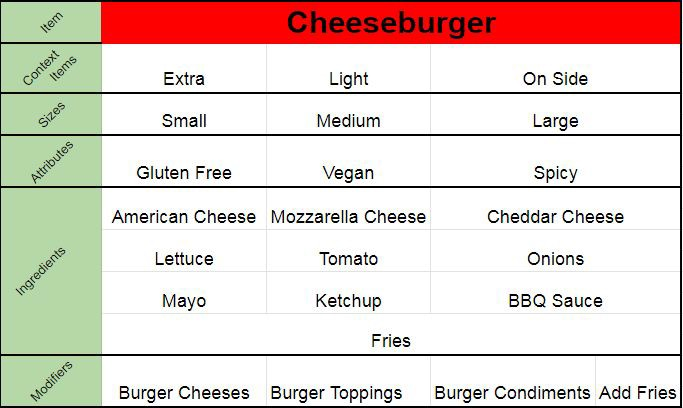
Finished Item Example
Account Menu
Throughout the Account Menu section you will see some of the following options:
 New will allow you to create a new item under the section that you are working on.
- You will see the option to Show Deleted under every option under Account Menu if something has been
- When you select Show Deleted you will see a list of everything that was deleted from that section that you are in, such as You will see all deleted Items and the setup that the deleted Item had when it was deleted. You will also have the option to Restore the item that was deleted as well.
 Show Account will show under every option under Account Menu but this option will only show if you are on an Account that has multiple locations and you are under one of the single locations and not under the full account.
 The Search bar will be at the top under every option under the Account Menu giving you the ability to search the section that you are in for specific items.
 When you are already in an Item, Ingredient, etc. this option will allow you to start creating a new option under the section that you are in. For example, if you are working on Items and you click this button this will start a new Item creation for you.
 This option allows you to Duplicate the item that you are currently in so that it will keep all of the same properties of the item that you are duplicating.
 This option will only appear if you are working on an account that has multiple locations. This is the Location Override option, which will allow you to set which location the item is assigned to and pricing for the different locations.
 This option will allow you to delete the item that you are currently looking at.
 This option will close out of the item that you are currently looking at so that you can get back to the full list of items under the section that you are currently working on.
 This option allows you to save the item that you are working on.
 When you see Set Image throughout the Account Menu, this option gives you the ability to assign an image for that item that you are working on.
 Throughout the Account Menu under the different options when you are in a specific item you will see this icon. When you click on this icon it will take you automatically to the item that the Eye is next to.
 - For example, if you are working on an item and you click the Eye next so the Kitchen Group that is selected, you will automatically be taken to that specific Kitchen Group and have the ability now view that item.
 Throughout the Account Menu under the different options you will see the Trash Can icon under the settings of the item that you are working on. This icon will allow you to remove that setting from the item. For example, if you are working on an item and you have a Kitchen Group selected, if you choose the Trash Can, this will remove that Kitchen Group from this item.
 Throughout the Account Menu under the different options you will see this icon under the settings of the item that you are working on. This icon will allow you to remove all of those setting from the item at once.
- For example, if you are working on an item and you have multiple Kitchen Groups selected, if you choose this icon, this will remove all Kitchen Groups from this item at once.
Context Items
Context Items are located under Account Menu > Context Items.
What is a context item?
A context item is a way to further modify an ingredient outside of selecting or deselecting the ingredient.
- Example - If the customer would like light lettuce on their cheeseburger, the context “light” would edit the ingredient of lettuce and will print to the kitchen as Light Lettuce.
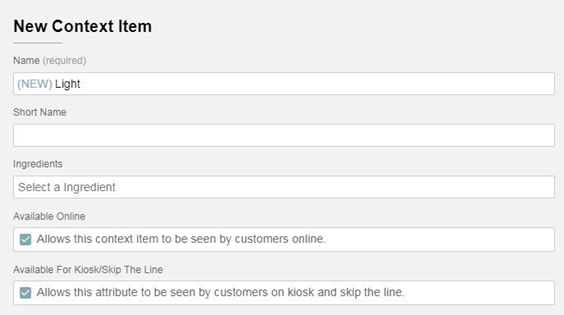
Creating Context Items
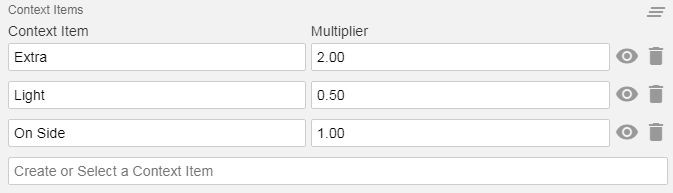
Example of Context Items; Light, Extra, On Side, etc.
- Select New.
- In the Name field you will enter the name for the Context Item that you are creating.
- In the Short Name field you have the choice to enter a Short Name if you would like. Short names will appear on Kitchen Chits, KDS, and when using small icons within the POS.
- In the Ingredients field you have the option to select from a drop down list of Ingredients that you have already created.
- In the Multipliers field next to the Ingredient you select you will need to enter in the Multiplier that you would like for this option. Example - Extra will be 2.00 and it will charge double the default price you have listed for the ingredient, On the Side will be 1.00 or 0.00 and it will not charge anything.
- Available Online, if this is checked this will allow customers to use this Context Item when ordering online.
- Available for Kiosk / Skip the Line - if this is checked this will allow customers to use this Context Item on the kiosk or skip the line when placing orders.
- Select Save at the bottom right.
Sizes
Sizes are located under Account Menu > Sizes
What is a Size?
Sizes are used to designate the size of an ingredient / item. Example - Small, Medium, Large, 12’’, 14”, 16” pizza.
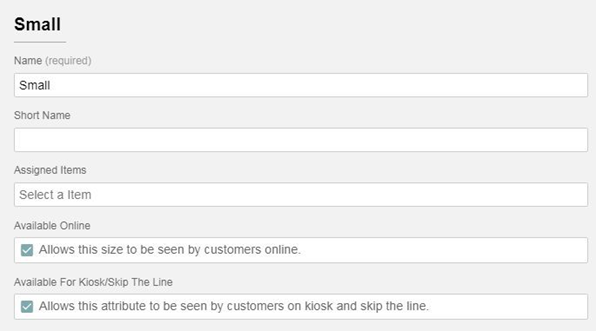
Creating Sizes
The following will help in creating the Small, Medium, and Large of our cheeseburger.
- Select New
- In the Name field you will enter the name for the Size Item that you are creating. For example, Small
- In the Short Name field you have the choice to enter a Short Name if you would like. Short names will appear on Kitchen Chits, KDS, and when using small icons within the POS.
- In the Assigned Items field you have the option to select from a drop down list of Items that you have already created and assign a Price that Item with this Size.
- Available Online, if this is checked this will allow customers to use this Context Item when ordering online.
- Available for Kiosk / Skip the Line - if this is checked this will allow customers to use this Context Item on the kiosk or skip the line when placing orders.
- Select Save at the bottom right.
Attributes
- Attributes are located under Account Menu > Attributes
- Attributes will have an option to Edit Sort Order.
- When editing a sort order, you can click and drag to which order you want your attributes First at the top, last at the bottom.


What is an Attribute?
An Attribute describes if the item has any allergens, spice level, or apart of an award winning group. Example - Gluten Free, Vegan, Mild, Hot, Award Winning, Ect.
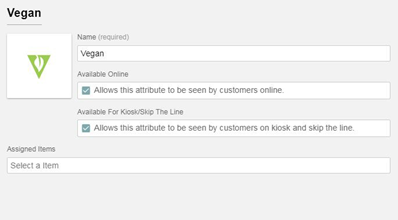
Creating Attributes
The following will help in creating the Gluten Free and Vegan Attributes for our cheeseburger.
- Select New
- In the Name field you will enter the name for the Attribute that you are creating. For Example, Vegan
- Available Online, if this is checked this will allow customers to use this Context Item when ordering online.
- Available for Kiosk / Skip the Line - if this is checked this will allow customers to use this Context Item on the kiosk or skip the line when placing orders.
- In the Assigned Items field you have the option to select from a drop down list of Items that you have already created and assign this Attribute to that item.
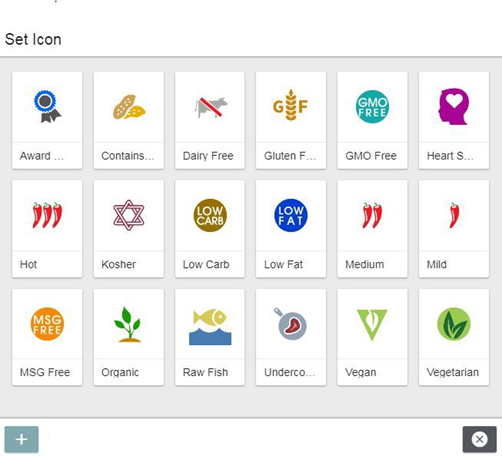
- If you would like to add a picture for this Attribute, Select Set Icon in the top Left next to the Name This will bring you to a new window to choose from a preset set of icons. You can also upload your own icon with the + button.
- Select Save
Ingredients
Ingredients are located under Account Menu > Ingredients
What is an Ingredient?
Ingredients are foods or options that allow you to modify items when you are inputting orders.
- Example - When ordering a Cheeseburger will have options for toppings and sauces. The ingredients you may have for this item will be options such as lettuce, onions, and tomatoes.
Creating Ingredients
- Select New
- In the Name field you will enter the name for the Ingredient that you are
- Example; American Cheese, Mozzarella Cheese, Lettuce, Tomato, Ketchup.
- In the Short Name field you have the choice to enter a Short Name if you would like.
- The Sub Item field will allow you to choose an Item that has already been The Sub Item will link this Ingredient to the Menu Item so that this Ingredient will take on the settings of the already created Item you selected.
- Example - Steak comes with a baked Baked potato is a part of the steak item and needs options of sour cream and butter. The baked potato ingredient would take on the options of the baked potato item that has those options configured.
- More info will go into sub-items near the end of the document to configure.
- In the Context Items field you will have the option to select Context Items that are already If you select a Context Item, you will have the option to enter in a Multiplier.
- The Multiplier will multiply the default price for this Ingredient that you have set by the Multiplier you enter.
- Extra will be 00 and it will charge double the default price you have listed for the ingredient, On the Side will be 1.00 or 0.00 and it will not charge anything.
- You can also Create a new Context Item within the Ingredients screen by typing in the new Context Item name and then hitting enter.
- In the Assigned Modifiers field you have the option to select the Modifier(s) that you already have created that you would like this Ingredient added to.
- The Misc. Ingredients will allow you to customize the price of the Ingredient within the POS.
- Available Online, if this is checked this will allow customers to use this Context Item when ordering online.
- Available for Kiosk / Skip the Line - if this is checked this will allow customers to use this Context Item on the kiosk or skip the line when placing orders.
- Select Save.
Modifiers
Modifiers are located under Account Menu > Modifiers
What is a Modifier?
Modifiers are groups of ingredients that you have the ability to assign to an item.
- Example - Bread Choice will contain the Ingredients that you have already created such as White, Wheat
Creating a Modifier
- Select New
- In the Name field you will enter the name for the Modifier that you are creating.
- In the Show Modifier Name field you will have a drop down with options to select from.
- Disabled - Will not show the name of Modifier Name on the POS screen or Kitchen Chit / KDS
- Ticket Screen - WIll only show the Modifier Name on the POS Ticket Screen'
- Kitchen - Will only show the Modifier Name on Kitchen Chits / KDS
- Both - Will show the Modifier Name on both Kitchen Chits / KDS and POS Ticket Screen

- In the Minimum Choices field you have the option to enter the minimum amount of choices required to select on the Modifier.
- Example - If you input 0, you do not have to select any If you input 1, the POS will force you to select 1 Ingredient from this Modifier.
- In the Maximum Choices field you have the option to enter the maximum amount of choices that are able to be selected.
- Example - If you input 0, you will be able to choose an unlimited amount of Ingredients from this If you input 1, you will only be able to choose up to 2 Ingredients from this Modifier.
- In the Number of Included Ingredients field you will have the option to enter in the number of ingredients that are included without charging.
- If you have defaults applied to the item, they will not apply to the included count.
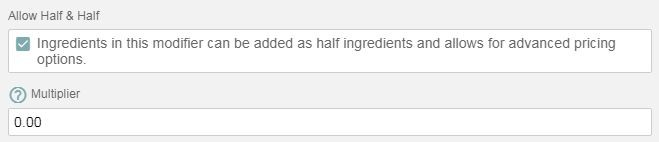
- Allow Half & Half, when this is checked this option allows you to choose half & half ingredients in this Modifier group, this option is typically used more for pizza like items.
- When this option is selected, a new option for Multiplier will appear so you can charge your Half & Half ingredients accordingly.
- Allow Duplicate Ingredients, when this is checked this option will allow you to add the same Ingredient multiple times.
- This option will be greyed out unless you have 2 or more entered in the Maximum Choice options.
- Allow Substitutes, when this option is checked this option will allow you to substitute any default ingredients that are selected on the This option will allow you to substitute a default ingredient for another ingredient in this group at no cost.
- Ignore Minimum Choices, when this option is checked this will allow you to ignore the minimum choices set at the POS This will not apply to Online Order, App Ordering, or on the Kiosk.
- Example - On the POS the staff member would be able to bypass the minimum amount but when ordering online the customer would still have to select the minimum amount of
- Button Color will allow you to change the color of the button that will show on the POS for the Ingredients in this Modifier . You have the option to select a color in the color wheel or a color in the Button Color also supports color hex codes.
- In the Ingredients field you have the option to select from a drop down list of Ingredients that you have already created that you would like to be in this If you select an Ingredient you will have a few more options that you can fill out.
- The 4 lines on the left will allow you to click and drag the Ingredients to the order you would like the Ingredients to appear on the POS within the
- Default Price will allow you to set the standard price to charge for this
- Size Pricing will allow you to set a standard price for this Ingredient based on what size is selected for the Item this Modifier is assigned to if the Item has Size You can change between the size options by clicking on the size that is listed above the Size Price field.
- Override will allow you to select a different Kitchen Group if this Ingredient needs to be printed to a different printer.